Showing posts with label modern quilting. Show all posts

Wednesday, May 20, 2015

Mini Quilt Swap

Hello again! Anyone still out there?? I am attempting to blog once a week, and have a backlog of old projects I would also like to catch up on, so this is the first one. Wish me luck, and thanks for reading!
Original inspiration fabrics
This past winter (whoa, where has the time gone??) I signed up for my second "mini quilt swap" on Instagram. This one was hosted by someone name SchnitzelandBoo and seems to have a lot of people participating! You get a partner and look through their Instagram account to get a feel for what they like, and then you make and send them a gift. Your partner is a secret, and it's actually a lot of fun!
I pulled the above fabrics to start with, and then stared at them for a few weeks. I really wanted to use the top one, which is a Nani Iro double gauze with cool neon dots, but I didn't have a plan other than that. 
Starting
After looking through my partner's photos I thought I would do something that was somewhat star shaped, had a white background, and used aqua. I found a paper-piecing pattern called "Celestial Star" from a shop called From Blank Pages. It's a cool block because depending on how you lay out the colors it can look really, really different. You can check out lots of examples on Instagram with #celestialstarqal. I eventually decided on this layout, but it wasn't easy!
Waiting to be quilted
The block is made up of 12 triangles that each contain 10-12 pieces so it is a lot to keep track of! It helped to use the coloring guide and cut out everything ahead of time, rather than cut as I go, which I occasionally do with paper piecing, even though it creates more waste I think.

Quilted
I used straight-line quilting to echo some of the shapes but kept it simple for the most part. I used aqua thread so it would stand out a little bit more.
FInished!
I used an older Anna Maria Horner print for the binding, and I really like it because although it has colors that arent in the quilt it still matches, or at least coordinates ( at least I think it does!). I must say that paper piecing can be really fun, and it can also be really tedious! I have to be in the right mood to do it, but I could never make enough of these blocks to equal a whole quilt. Yikes. That would be so many pieces of fabric!! But I am working on a much more simpler paper-piecing project for a large quilt for myself (when I have extra time, which is so far not at all), so we'll see how that one goes!

I have one more mini that I am finishing up for a Cotton and Steel swap, which now that I think about it also involves aqua, a circle, and white, but ah well!


Tuesday, January 6, 2015

Quilting Bee! Everything you ever hoped to learn, and more!

Thanks again for signing up for a quilting bee! They are a lot of fun, and I am looking forward to seeing what everyone is able to create and learn throughout the coming year! Below are the general guidelines for being a part of a bee. If you have any additional questions, feel free to ask!

When you are the host:
When you are the host you will be in charge of emailing the rest of the hive at the beginning of your month, telling everyone what block you'd like! (or, if this is a more free-form request, just what size and color). This is also a good time to introduce yourself a bit and tell everyone a bit about yourself! The deadline for emailing out the info will be the 4th of each month, but feel free to do it sooner. Tell them the color scheme you are after, and if there is a specific fabric you'd like them to use, then please be prepared to mail that out to everyone. You also want to let your bee know whether you want seams pressed open, or in one direction, and whether or not you want them to send trimmed blocks to you.  Generally, you will make yourself a block as well, and possibly, at the beginning of the month, post a photo of the fabrics you are planning to use so people have a better idea of what you're after. Then you just sit back and let the blocks roll in! Be sure to send out your address when you email the hive so everyone knows where to mail their blocks, and then keep track as you get them of who has sent theirs in and who hasn't.

Here is a link to a Pinterest page I've started with links to many blocks and block tutorials. I will keep adding to it! Click here!

When you are making blocks for others:
This is a fun chance to get to make blocks you wouldn't normally make, and possibly work with color combos that you wouldnt always choose for yourself. Embrace it! Try your best to follow the guidelines given to you by the host each month. Feel free to post pictures of fabric possibilities if you want feedback from the host. If you are having trouble with any part of a block, just reach out for help! That's another benefit to being in a bee, that you have other people to give you pointers and tips. You also want to make sure to iron seams however it's been requested, and check if the host wants their block trimmed or untrimmed. Do you best to mail things on time! I know months can get hectic and fly by, so if you know you will be a week or so late, just let the host know that you still plan on making the block. The deadline to mail should be around the 10th of the following month. When you mail, please put your block inside a ziploc bag, just in case! And include a note so the host knows who it is from!

One more thing it is useful to have during a quilting bee is a "queen bee," this is simply a person who keeps track of things and makes sure that everyone is sending their blocks on time, and if someone vanishes from the bee they can help to find a replacement. The month that you are the host, you will want to report to them who, if anyone, did not send you blocks.
Collected blocks from my first bee, up on my design wall


Thursday, January 1, 2015

Join a Quilting Bee in 2015!

One of my favorite things that I did in 2014 was take part in my very first quilt bee! I saw on Instagram that someone was getting groups (or hives) together for a bee using a book my friend Lindsay wrote! (see book here). I had never done a bee before and thought it would be fun to try.

A bee, for those of you who havent done one before, is made up of 12 people, and it takes a 1 year commitment. This is because each person in the bee gets assigned a month that is "theirs." When it is your month, you chose the block and the color scheme, and the 11 other people in your bee make the block that you have chosen. I have seen bees where people mail out fabric to the other group members, but I really enjoyed seeing what other people had in their stash, and having the chance to receive fabrics that I had never bought or even seen before! The 11 other members are to send their completed block to you by the end of your month, and then, ideally, they have 12 (or sometimes 24, if the block is smaller) blocks with which to make their own quilt! Then the next month begins and you get a new block assignment from someone else!

Some of the blocks I have made in my bee this year
There was a lot that I loved about the bee (and I've written about it in more detail here). It was really fun and interesting to me to see what color combinations people requested, and it is fun to work in a palate that you dont normally work in. It's a good way to stretch your design sensibility, I think. I also liked that a lot of this bee took place on Instagram, a really fun way to connect and see peoples progress. Sewing is such a visual hobby, and has a history of companionship, back when quilt bees were worked on all together in person, and I like that Instagram can help create a modern version of this. For all the bad things that people say about technology making us more isolated and removed from human interaction, I think it also has the ability to bring you close to people that you wouldnt get to meet or interact with otherwise.

Good, old-fashioned fun! (image from here)

And that brings me to the bees I'd like to get started this year! What better time than now to start something new!

1. The Tennessee Local Bee (#tnlocalhoneybee)-- I'd love to start a bee of people living in or around Nashville (or just TN in general if there arent enough people interested in town). I would love to incorporate some of the in-person aspects of the quilting bee, such as coming together to help baste large quilts (and being able to take advantage of the large table in the store to make this so much easier!), to possibly having group quilting days, hanging out drinking tea, and having the option of choosing any fabric at the store to use and have it available at a discount. This can be open to all levels of skill, so dont be shy if you have never done a bee.

2. The Newbie Bee (#newbiebee2015)-- For first timers! A great place to start, and I will post throughout the year and be available to answer any questions that may arise. This will be for beginner-intermediate skill levels, and you will also receive discounts at the online Etsy portion of The Fabric Studio throughout the year.

3. Paper-Piecing/ Advanced Block Bee (#challengeacceptedbee2015)-- Is 2015 the year you'd like to push yourself to try more difficult blocks, and maybe learn a few new techniques? Maybe you've seen some of From Blank Pages' amazing paper-pieced quilts but thought there was no way you could ever make 12 of the same thing (I know I have). I think (and hope!) this bee will create some really spectacular quilts that just might not be possible on your own. Keep in mind for this bee people may be choosing paper piecing patterns that you would need to purchase (usually these are less than $10, though there are also tons of free ones available) but just think of it as a way to expand your pattern library and help independent pattern designers. Discounts from The Fabric Studio will also apply.

So, if any of these sound tempting and fun to you, please do join! You can leave a comment with your email and which bee you'd like to join, and I'll be emailing you with info in the next week. Looking forward to a fun and quilt-y 2015!!

Some of my favorite #moderninstabee2014 quilts
(from instagrm users @alexandra1008, @heatherisgr8, @tennjenny, and @tifray)

Wednesday, December 31, 2014

Happy New Years!


Well, we can' move forward into a new year without taking a quick look back first! Although I originally made little quick slid shoes of pictures, I can't get them to load here! So instead of showing you everything I made and did, I will chose to edit it down to 9 favorites in a few different categories!

Favorite Store Moments!
This was a big year for me, with the store opening and everything that came along with that! I absolutely loved taking and teaching classes at the shop, doing my first quilting bee, having the outdoor quilt show, and being able to spend so much creative, productive time in this sunny little place I'm building! There were so many fun new things, like going to quilt market, filming for The Sewing Party, the outdoor quilt show, participating in Sewvivor, and so much more! It hasn't always been easy, but it's always been interesting, and that's way better anyway!

Favorite Quilts, 2014

Now on to the favorite results of my favorite thing to make: quilts! My records show that I made almost 30 quilts this year, if you include a few minis (which I do, because they can still take forever!) And they all had a special place in my heart, but here are my top 9! I guess I can see a bit of a theme, color wise, as they dont look especially different from each other, so maybe 2015 i branch out? That or I settle into a signature style. See more here!

Garment Makes 2014

I also explored the wide and wonderful world of garment sewing for the first time with any real success this year! From my first Briar Tee to dip my toes into knits, to the McCalls pattern I have almost successfully finished, to finally attempting button holes, I am proud of the things I tried this year! Though they weren't all successes, I am happy with the additions I have to my wardrobe, and the possibilities for what else I can learn in the coming year.

Thanks for following along on this adventure with me. Looking forward to sharing 2015 with you as well!!

xoxo
Nancy

Friday, October 31, 2014

Pretty in Pink Spiderweb Quilt


Pink Scrappy Spiderwebs!
I am so excited and happy to have this quilt finished! When I lived in Indianapolis and went to the Modern Quilt Guild meetings there we had one meeting where we learned how to do this block, called the Spiderweb block, and I get really hooked on making them! This was back in 2011 I guess? I used all my pink scraps and a pink kona solid, I believe called Baby Pink? It was really fun to make something with just scraps, and it's even more fun now since they're older and the remind me of projects I did a long time ago.
Scrap-tastic
I did get a little overwhelmed by all the pink so in the end I added 1 1/2 aqua webs, which are now maybe my favorite part. Plus, it is hard for me to make a project without using aqua! So I think I finished making all the blocks while I still lived in Indy, and then I moved home for a bit, where I pieced the top. Also while at home I made a different back, more scrappy (and not at all lying flat), and attempted to start quilting it.

Close up of the actual final quilting, by Sarah Russet (strawberries!)
It did not go well! I hated it, and I couldnt think of a good way to quilt it and I didnt want to ruin it because I liked the top so much! So I packed it all up and moved it with me to Nashville! Where it sat in a box for over a year. Sad!
Remade back! Heather Ross and Michael Miller Glitz in pink and gold. 
When I decided to send out my bee quilt for quilting I thought it would be great to send out this one as well, to have a professional do something that wouldnt ruin my hard work! I remade the back so that it would lie flat and not be as scrappy. When I saw Sarah's strawberry quilting design and knew that would be perfect! I had also already made the binding ages ago, in the same pink as the front so that it didnt take away from the scrappiness of the spiderwebs. And mom was kind enough to hand bind it while she was visiting so it looks nice and clean and perfect!
Brown legged quilt
I am so happy with this quilt! It's kind of smaller than a normal throw-size, but would be perfect for a little girls room. Or a little boy! I had originally planned on giving this as a gift or selling it, but now that it's been on this muli-year and multi-state journey with me, I think I need to keep it! It feels so good to have a quilt out of the storage bin, and I like seeing all the scraps of fabric that I have used on so many other projects. Do you have any long-term works in progress lying around? What keeps you from finishing? I know its hard when you no longer like things you started ages ago-- makes it harder to find the motivation to finish things. Luckily this one has stood the test of time!

Happy Non-Spooky Halloween!

Tuesday, October 21, 2014

Ombré Half-Square Triangles

Ombre half-square triangles
My most recently finished quilt, which was ordered by a friend of a friend, is for a baby who lives in Bermuda with his parents who just moved there from Chicago. The pictures of the nursery showed it to be really modern, mostly white with dark, dark grey-ish blue walls.
Peak of the back
I didnt really have a plan going in other than that she wanted some fabrics having to do with the beach/ocean and some having to do with the city. The city ones were a bit harder to find, but there's a line from Art Gallery that just came out called Gramercy that has a cool black print with brownstone-type buildings on it.

After I had the fabrics picked out I grouped them into light, medium, and dark tones, then cut them into squares and matched them with a square in a similar color shade family. Then I just made a big stack of half square triangles!

I tried a few different layouts, and eventually had to make a few more light-colored squares. I tried having it light in the middle, radiating out to dark, but I think this way worked out a little better. And it kind of reminds me of the ocean too!
Embroidered initials and birthday 
I used teal thread to quilt with, and did my usual straightline grid. The aqua really only shows up on the light sections, and then it blends into the background. Its a good color though! The back fabric and binding are all Art Gallery prints, which are extra soft.

The back
This quilt is a little outside of my comfort zone, with all the dark colors, but I hope the recipients like it! I also thought it was fun to do the half-square triangles in a random arrangement, but with color as a guide. Just something new and fun to try! 

Sunday, October 5, 2014

Patchwork Plus Quilt

Navy, green, yellow, grey Plus patchwork quilt

Greetings from The Fabric Studio! Finished another fun quilt today, this one was an order from my top customer, my cousin Stephanie, for her sister and brother-in-law who are having a baby boy. She send me photos of a few things they had bought for the nursery, one being a graphic, modern green and white rug, and the other being some grey and navy sheets that I believe had sailboats on them. 

Diagonal straight-line quilting and close up
I really liked the idea of bright green, which I must not work with much because I had to order a few more pieces. I added in navy and bright blues, a few yellows, and then some neutral greys and whites so it wasn't quite so crazy. I cut 4 1/2" squares for this one, just like the last quilt I made, because I really like the size the end up being. It's a good size for showing off fabric, but not too big, and not so small that you have to cut a million squares (just 120 instead :)  ). Then I laid them out in a plus pattern, which is fun to do and gives a more modern look to what is essentially just a patchwork quilt. 

Pieced back
I've been doing a lot of quilt backs out of just one fabric lately, because it's quicker, but I had some squares left over, and I really ended up liking the combo of green and navy fabric on the back. I may go back to pieced backs, because I really like this one, and especially on baby quilts it really doesnt take that long. 

Bridge fabric by Michael Miller, available here
I did a simple straight-line quilting going diagonally through the patchwork squares. I was going to go back the other way to make an X through each box, but I ended up using green thread and didnt want it to stand out too much on top of some of the lighter colored fabrics. I think this is enough quilting, and the quilt is still nice and soft! 

I used a nice green solid by Michael Miller (Cotton Couture in Apple), which I think both contrasts and blends, which worked out! Sending this quilt off tomorrow, and then on to the next! I dont usually work with such dark, bold colors, but I must say I liked it! I think I'll look for a few good bright greens for the store (but they arent easy to fine!)

What are you working on right now?

Tuesday, September 23, 2014

Star Patchwork Baby Quilt

Star and Patchwork Baby Quilt
Greetings! Well, fair warning, this post has kind of a lot of photos! I just really, really love this quilt and I was actually sad to send it away. My friend's cousin recently had a baby, and her sister ordered a quilt for me. I've known this family since I was in middle school, so it's always nice to make something for someone you know. The only directions I had were to use a little bit of green to match a nursery, still make it girly, and embroider the baby's name on it. 
Maybe my favorite section. Love that horse and carrot!
Honestly, I had some problems for a while coming up with an idea! I didnt know what pattern or fabrics to use, so I was stumped for many weeks. I did know that I wanted to use a Tina Givens print, "Elephant Flight," which is the center pink square in the bottom row above. It is pink with white elephants dangling from hot air balloons!! I've been wanting to use it in a baby quilt since I ordered it. I had also recently ordered some cute prints from the "Wee Wander" line , which are cute kids and horses and have some green. From there I gathered up 8 or 9 other fabrics from the store, and ended up with what I think is a really fun color palate. Though there is aqua in it, and grey, it still felt new and fresh for me to use, possibly because of the addition of yellow and purple, 2 colors I dont generally use, especially together. 
Embroidered Star
I hadnt made a patchwork quilt in ages, so I thought I'd go that direction, but and the last minute decided to ad a few stars in a light, contrasting print, and I'm really glad I did because it's my favorite part of the quilt now. I cut 4 1/2" squares, and then embroidered the name on an 8" square that would take the place of 4 of the regular patchwork pieces. 
Close-up
For the back I used the elephant print, which I love cut up but also love as a large print, and added one row of scrappy pieces I had left over from cutting the patchwork squares. I quilted straight lines on either side of every seam, which actually didnt take that long on a quilt this size, maybe 90 minutes, and then I also outlined each star, which was tedious and added probably another 45 minutes, but I like it so it's ok. 
The back
For binding I used a coordinating aqua polka dot by Dear Stella, which has a slight bit of stiffness to it that actually makes it really great to work with as binding. Although I have recently learned how to hand-bind, and dont mind it, I must say my machine-binding technique is getting pretty solid too! 

Machine binding
I also really like how the aqua binding looks next to the pink of the backing fabric. Its almost a lavender-y pink, and they look neat together.
More machine binding
I kept this quilt around the store for a few extra days before sending it out because I just didnt want to part with it! I was also able to use a few fabrics that I used in a wedding quilt for the mother of the baby, plus a few fabrics I used in the baby's cousin's baby quilt, so I like that they are all kind of tied together. 
In the harsh light of sunset. 
Also, I sewed these squares up in sections of 2 or 3 at a time, instead of piecing whole rows, and it made a big difference in getting the points to line up. Some still didnt, but a lot more did than normal. Check it out!
Beautiful point matching.... and above, point non-matching
I love every single fabric in this quilt, and I love that even though I've been staring at the same group of fabrics in my shop now for 6 months I was able to come up with a combo that felt new to me. It was a fun quilt to make and I hope baby Marie Elizabeth will love it for years to come!

Friday, August 22, 2014

Triangle Wedding Quilt


Equilateral Triangle Wedding Quilt
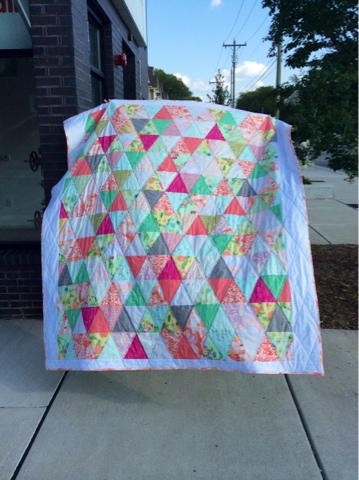
I recently finished an order for my friend Angie, who orders a lot of quilts from me to give as a wedding gift. She just told me that she wanted it to be coral, pink, and green. Any shade of green! So I gathered a nice little bundle of fabrics together, added some gold and grey because I'm starting to think I can't make a project without gold, and cut up some triangles! Triangles, however, do seem to shrink up way more than squares to when you sew them together! Hence, the border I added in order for it to be big enough.

Close up
I used a triangle ruler this time, instead of just a homemade cardstock template, and what a big difference! Much easier. I really like the fabrics I used for this quilt, a mix of new fabrics and ones I found in my stash. I particularly liked this larger-scale print of peaches on a green background. It was kind of watercolor-y and vintage looking and unique!

Binding Auditions
I couldnt decide which fabric to use for binding so I posted this picture to Instagram for feedback and it was pretty much a unanimous vote for the watercolor fabric on the left (which is called Cascade Coral by Art Gallery). I think it was the right choice! I really like how to pops next to the white, and the green of the background fabric.

Binding
I accidentally cut the binding way too skinny, so it was a bit of a labor to attach it, and in all honesty it does not look great close up. Just crossing my fingers that the recipients are big-picture people, instead of detail people... and that there's no hard-core traditional quilters in their family!

Quilt back
For the back of the quilt I used a fabric from Tula Pink's Fox Field line, which is a fun print that looks like just a floral at first but there are little animals hiding in it, like foxes and bunnies and birds, and its a pretty mix of greens, aquas, and taupe. I normally do a bit of piecing for quilt backs, so making this out of just one fabric was so quick! I liked just having to do one seam. I also like how the quilting lines show up as a diamond pattern on the back, and also how on the front, the diamond shapes only really show up on the border.

Quilts in the wild
So, another one completed! This one did take a while so I am glad to have it finished and sent out in time for it to be a wedding gift, and I hope they love it!

Thursday, August 7, 2014

Lonestar Quilt

Lonestar Quilt!
I recently finished up another quilt order, for my cousin's best friend's wedding. I saw a giant star quilt on flickr and tracked down the blog, where, happily, there was a tutorial! The one I used was at Bea Spoke Quilts. She gives you the basics on how to make a big star like this.

Quilting in progress
I dont really have an in-progress shots, but it was a pretty quick top to make since all the pieces are so big. I think it showcases fabrics nicely, and, using the wedding invite for inspiration, I decided on a coral/pink/aqua/grey color palette that was mostly, but not all, Art Gallery fabrics. I used Teensy Weensy in Lotus for the background, which is white with tiny, cute little pink and grey plus signs, which I thought was great for a wedding. (available here!)

Attaching the binding
I used a grey fabric for the binding that has tiny gold lines on it. It's hard to capture the details of a quilt in photos! But they're there, I promise.

Lonestar visits Ohio 
I did a line of quilting on either side of each seam, and then traced around the whole star as well. I really like straight-line quilting, which is good because my new machine really sucks at free motion! (constant tension issues. so annoying!) I like how the lines echo out around the star, and I like how they have the star pattern on the back of the quilt, even though that is also hard to see. I added a 3" border of rectangles along the top and bottom of the quilt to make it a little bigger, and I also like rectangluar quilts better than square quilts, so this solved that problem. I think it looks good too!

Art Gallery on the back. 
Although I normally piece my backs I had more than enough of this print, and I really like it as one solid piece for the back. The pops of yellow make me happy. 

It's since been sent off to the new couple (I think!) so I hope they like it and enjoy it for years to come. Up this month, another wedding quilt in similar colors, but triangles! And 2 baby quilts. And, hopefully, customers at the store!

What are you working on?

Friday, July 18, 2014

Sewviver Entry for The Fabric Studio

This is a quilt I've been meaning to blog about for ages but never got around to it! I thought it would be perfect to use it as my entry for the "Sewviver" quilt competition!  It seems like a really fun contest with different challenges each month, so we'll see! 

First, some background on the quilt: when I lived in Indianapolis in 2011 I went through a long phase of listening to the same Dr Dog cd every single day. (I do that a lot with bands... Dr. Dog finally broke the 2-year Paul Simon loop I had previously been stuck in. Happily stuck of course!). There is a line from a song, "what you thought was a hurricane was just the rustling of the wind," and it really resonated with me at the time. Then, I took it to mean that although things always seem big and important in the moment, they usually turn out to not really matter that much. It was a reminder to just calm down and not worry. So I knew I wanted to make something to go in my house with the quote. For the longest time (probably a good 6 months), I didnt know what to make. I thought about a poster, or cross stitch, but didnt seem quite right. Then I think when I was driving to IL to move back to Chicago from Indy it hit me: make a quilt!!


I started working on it while living at home in the fall and winter of 2012. I didnt use any type of pattern, and I made each letter one at a time, in order of how they are written, just improve cutting and hoping for the best, and filling in the rows with the different creams, whites, and golds I had picked out for background fabrics.  Below is a picture of the early stages hanging on the design wall in my parents basement. 


When I moved to Nashville I packed it up and put it on my new design wall. I really went slowly with this quilt because I had no plan ahead of time other than the quote. I just kinda waited until I had an idea that felt right, and then I went with it. I have always loved stars, so I knew they needed to be involved, and then the last side I made, the scattered triangles, I wanted to look like they were blowing in the wind. 


I had the top done for a long time before I started quilting it because I had no idea what to do! The quilt is huge! (For me anyway, and my little Singer). So, I made the back with more stars and some great coral solids that I dont remember what brand or color they are :( Sad! Im bad at keeping track of that kind of stuff. 


At some point I had coffee with a quilting friend and we were looking at examples of text quilts online, and how they were quilted. Like a crazy person, I decided I wanted to do straightline quilting, about 1/2" apart. I would never attempt this again, because it took sooooo long, but I do love how it looks. On the text section, the lines are randomly spaced but no more than an inch (mostly much closer), and they run up and down. On the star section the lines go cross-wise. Then on the part with the triangles I extended the line made by the angled side of the trianlge, and just quilted along that edge. I love that part the best and how it looks random but I actually comes from the shapes in the quilt. 

The pictures below sort of show the quilting lines, but I dont really have any great shots. It took about a year and a half from conception to completion, but so worth it!


And one more, quilt in the sunshine photo.


Thanks for taking a look! I love cuddling with this blanket, love the mix of white, gold, coral, and pink fabrics, and love that I am done and dont have to work on it anymore!